The Musicarta Canon Project
Scale Practice Patterns
Good musicians, whether pop, jazz or classical, practice playing up and down the notes of their instruments quickly and evenly so that they can play the notes they want when they want.
Playing scales is also an essential part of learning keys. Efficient scale practice should accustom the musician to the ‘look and feel’ of the advanced keys, and knowing the keys is essential is you want to be a complete musician.
Musicarta scale practice patterns are a way of learning and practising scales efficiently, so you won’t spend hours slogging mechanically through the scales without getting what’s useful to you as a musician out of it – from the word go.
D major scales for the Canon
The first part of this module explains the D major key signature. The material applies in principle to all key signatures.
The second part of the module explains scale fingering. D major shares the same fingering pattern as the C, G, A and E scales, so scale practice in D major counts as work in these other scales as well.
The bulk of the module presents a basic collection of SCALE PRACTICE PATTERNS. Adding rhythm and contour to scale practice hugely multiplies its value. The scale practice patterns are presented as line-diagram ‘cues’ for note-free practice. The line-diagram practice pattern cues are intended to be used to practice scales in all other keys.
The D major key signature
The black keys necessary for playing ‘in a key’ are indicated in the key signature.
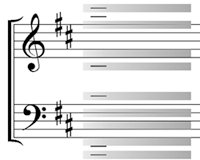
In D, all notes written on the lines or in the spaces shaded in the diagram above (any F or C on the piano, in fact) are played on black keys F sharp and C sharp, which replace white keys F and C, but, for clarity, only two sharps are shown on each clef. The rest are understood.
This diagram shows one octave of D major scale-tones. It could be anywhere on the keyboard.

The replaced white keys F and C have been greyed out, along with the black keys you do not use. This is how the well-schooled keyboard player sees the keyboard as soon as he or she sees the two-sharp key signature.
(Note that, if a key signature shows two sharps, they are always F sharp and C sharp, never any other two sharps.)
D major scale fingering
The main reason for learning scales in keyboard playing is to learn keys. If you know your D major scale, you know what the key of D major ‘looks like’, and you will much less likely to play wrong notes.
Here is our sample octave of D major showing which fingers play which notes. (Use keys in the middle of your keyboard if you want to experiment.)
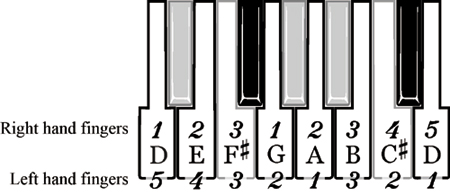
There are eight notes in the octave but only five fingers on the hand, so we have to play a group of three fingers as well as the handful of five:

This means you have to pass the thumb under or the third finger over to play the full octave.
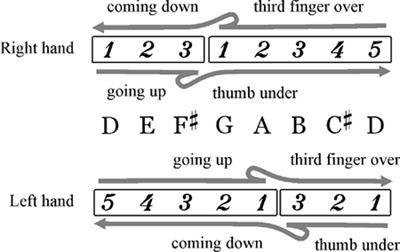
In the scale practice patterns that follow, you will use these piano keys and fingers, around middle C.

Scale practice patterns
The thumb-under movement, hands separately
Practice the right hand thumb-under movement three times, then complete the octave.

Practice the left hand thumb-under movement in the same way. You will play from the top.

Thumb under, hands together
The main challenge when playing scales with both hands together is that there is a third-finger-over or thumb-under movement in one hand while the other hand is playing simple 1–2–3–4–5 or 5–4–3–2–1.
This is something that needs practice. Here is a study for this challenging movement.

You run up and down the first five notes of the D major scale, hands together, using the actual scale fingering. The right hand practices the thumb-under and third-finger-over movement (complicated) while the left hand just plays from one side of the hand to the other (simple).
Note: You can practice the right hand on its own first if you need to.
The thumb-under/third-finger-over movements are still boxed, but the black key F sharp is not circled. Both third fingers play an F sharp.
Practice until the fingering is ‘in your hand’.
Next, we use a similar study for the top five notes of the scale, where the left hand does the ‘complicated’ movement and the right hand is ‘simple’.

The black key in this part of the scale is C sharp – right hand finger 4 (RH4) and left hand finger 2 (LH2).
Rehearse thumb under, then all the way
Rehearse the first five fingers, then run up to the top of the octave. You will run out of left hand fingers – this is where you bring your third finger over.
Play from the bottom first.

Practice the pattern from the top down as well.

One octave hands together
You have rehearsed the thumb-under component of the one-octave scales. Now play one-octave scales, hands together, from the bottom to the top.

Stop at the top briefly before playing again.
Play from the top down.

Play one octave up-and-then-down.
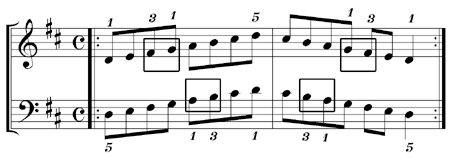
Play one octave down-and-then-up.
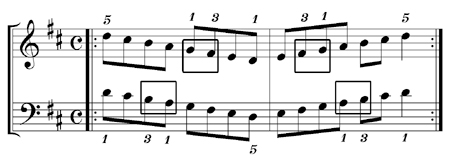
Playing scale practice patterns by shape
The idea behind scale practice for the modern popular music keyboard player is the get the keys into the fingers, and the less written music involved, the better. It is therefore a good idea to learn to practice scales from scale practice pattern ‘shapes’, rather than from notes.
Look at this scale practice pattern (which you have already played):

The pattern can be represented by this line diagram:

The pattern runs up and down the first five notes three times, then all the way to the top. Play the audio and/or the MIDI file to see how the line diagram represents the pattern.
The next practice pattern does the same thing, but upside down – from the top.

As a line diagram, it will look like this.

Play the audio and/or the MIDI file again to see how the line diagram represents the pattern.
Other scale practice shapes
As line diagrams, other scale practice patterns you have encountered in this module so far will look like this.

RH and LH mean ‘Play with the right hand (or left hand) alone’. LH/RH means ‘Play with hands together’.
Play the scale practice patterns in D major from the line diagrams alone. You yourself have to remember two things:
- The black keys, F sharp and C sharp, and
- The scale fingering – where the thumb passes under or the third finger over, in each hand.
Check, using the audio and MIDI performance files, that you have got it right. If necessary, scroll back and check the scale practice patterns music.
Here is the next set of scale practice patterns.
You want to be ‘seeing the key of D in the keyboard’ – no white key F’s of C’s, but black-key F sharps and C sharps instead. Here’s the ‘virtual D’ keyboard again.

Check your scale fingering
If you’re working on your own, only you can say if you’re using the right fingers or not. You know you’ve gone wrong with the fingering somewhere if you:
- Run out of fingers with notes of the scale still left to play, or
- Finish the scale with fingers to spare (that is, not on finger 5 or 1 in the key of D ), or
- Find you’re trying to play a black key with the thumb.
If that is the case:
- Back-track until you identify your mistake – so you can correct it.
- Practice the right way at least twice as many times as you played it wrong, to correct your muscle memory.
Collected scale practice pattern shapes
Here are the collected scale practice pattern shapes. RH or LH mean ‘Play with the right hand (or left hand) alone’. LH/RH means ‘Play with hands together’.
Playing scales from these patterns will reinforce your knowledge of the keys and improve your ability to see shape and pattern in music generally.
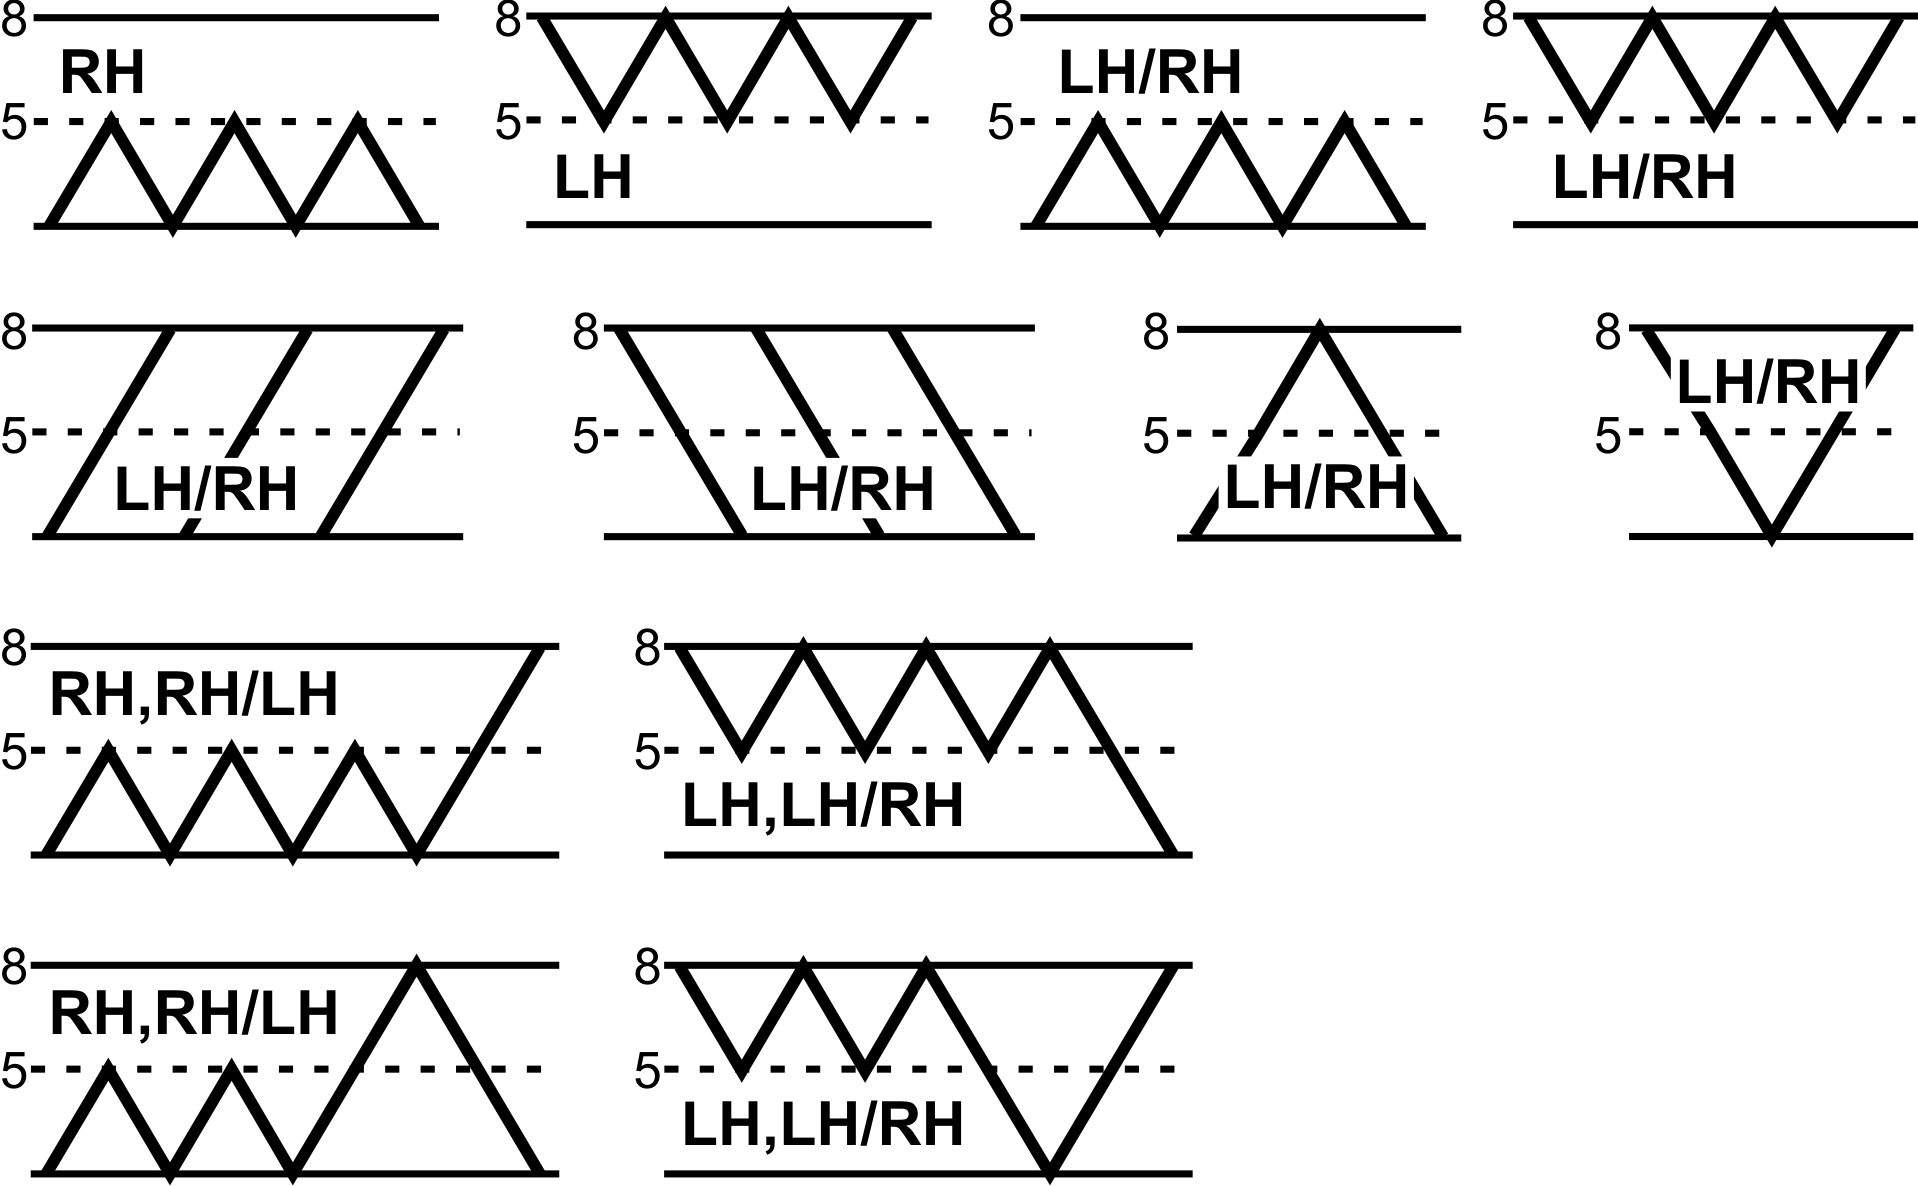
Written-out music for the last two line diagrams in this collection hasn’t been presented. To check your understanding, play the patterns from the line diagram alone, and then check your work with the audio and MIDI performance files:
You can use these scale practice patterns to practice any major or minor scale. Getting away from written-out scale music will greatly increase the value of your scale practice. The D major fingering you have learned works for C major and the sharp keys G, D, A and E. All you have to do is start on the tonic (the name-note of the scale), and substitute black keys for white keys as shown in the key signature.
Thanks for visiting MUSICARTA! Come again soon!
|
OUT NOW! |
THE MUSICARTA BEAT & RHYTHM WORKBOOK At last! An effective approach to keyboard rhythm & syncopation skills. Learn more! |
ONLY $24.95! |
THE MUSICARTA
|
The MusicartaA methodical approach to keyboard syncopation for
|
PUBLICATIONS
exciting keyboard
creativity courses
CHORDS 101
WORKBOOK

~HANON~
video course

Musicarta
Patreon
PENTATONICS
WORKBOOK
video course

Creative Keyboard
video course

BEAT AND RHYTHM
WORKBOOK
- Volume 1 -

12-BAR PIANO
STYLES WORKBOOK
MUSICARTA MODES
WORKBOOK
PIANO STYLE
CANON PROJECT
video course
VARIATIONS
video course

- Piano Solo -
video course

- Piano Solo -


YouTube playlists


