The Musicarta Canon Project Module Seven
Accompaniment Patterns
Most pieces of music have a musical background which supports the melody. This background is not random – it often repeats the notes of the chords in the chord sequence in predictable, rhythmic patterns. The successful modern keyboard player needs to be able to devise these accompaniment patterns from chord symbols.
Here is the module performance, which plays some of the treble patterns you’ve learnt previously over the accompaniment pattern you’ll be learning in this module. Listen to the four clear rising notes per bar in the bass.
Naming the chord tones
Accompaniment patterns are usually made from the root, the third and the fifth (the chord tones) of the chord named in the chord symbol. In the Canon, we find them by counting D major scale tones up from the root (name-note) of the chord, whichever chard it is, as shown in the next illustration. The root is number one – there is no zero in this kind of counting.
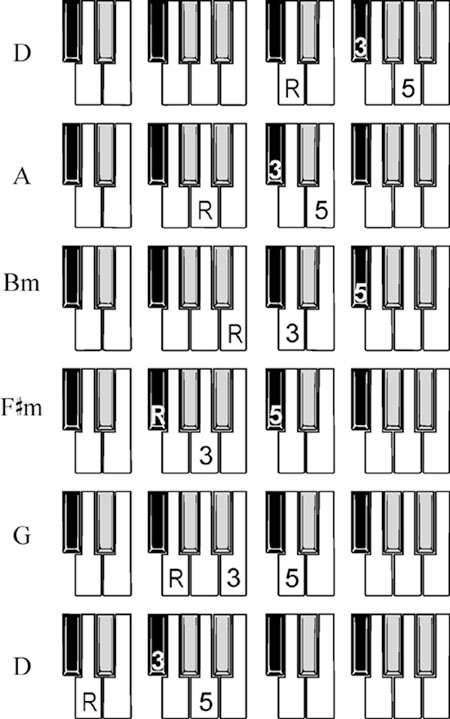
You have found these notes before, but you didn’t name them as chord tones root, third and fifth. Find them again and name the notes as you play them, as in the audio file.
The chord tones keep their own names wherever they are on the keyboard. The note F sharp is always the third of a D major chord, whether it’s above or below the D in a chord, and so on.
Here are the chord tones of our five Canon chords, played and named from around the D below middle C.
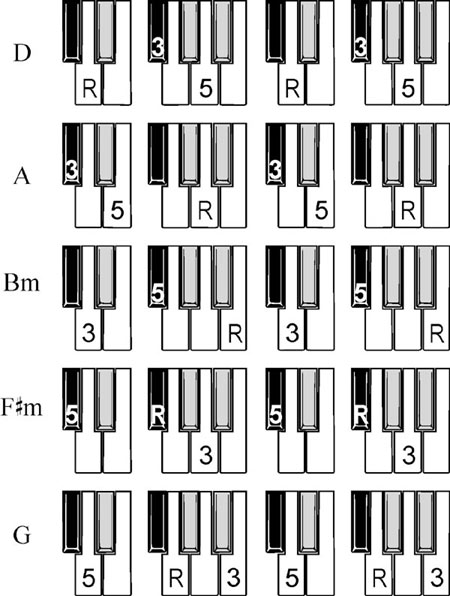
Find and play the notes, saying the chord tone names.
Sometimes, though, it’s useful to give the root and the third different names, especially when there are four notes to name – as you’ll learn in the next section.
Canon accompaniment patterns
Here is the teaching video for this section of the module.
The Canon accompaniment has four strong beats for each chord in the chord sequence. (Listen for them in one of your audio performance tracks.) We can get four notes by playing another root note an octave above the first one. We call this second root note ‘the octave’ (8), to show it’s a different key on the keyboard.
We say we have ‘doubled’ the root because we play the second note as well as, not instead of, the first.
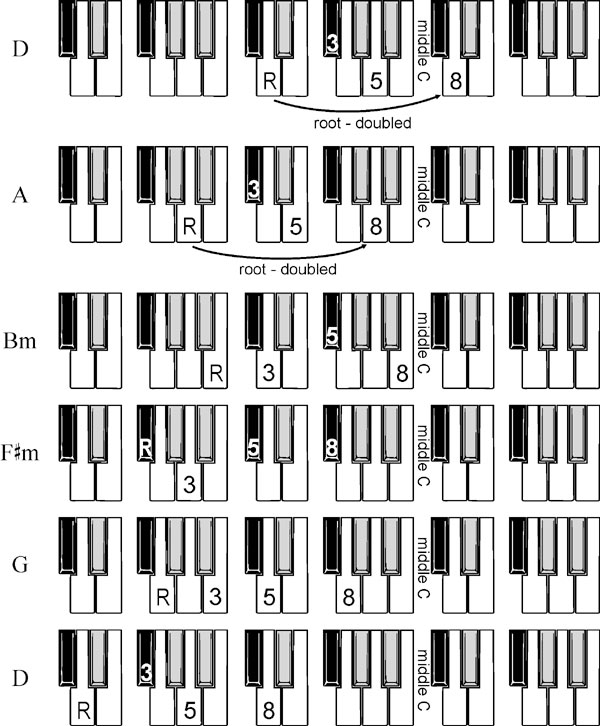
Splitting the chord tones differently
It’s essential going forward that you can find these notes with minimal delay for all five Canon chords.
Here's an exercise that's sure to 'bed them in'.
Here's a performance that cycles through the options. Watch, then play along or play by yourself over a backing track.
The R, 5, 8, 10 accompaniment pattern
Here's the teaching video for this section of the module.
The most attractive four-note chord tone pattern takes the third (3) of the R, 3, 5, 8 pattern up an octave. To show that the third is in a new place, we call it ‘the tenth’ (10), carrying on counting up from the octave (8).
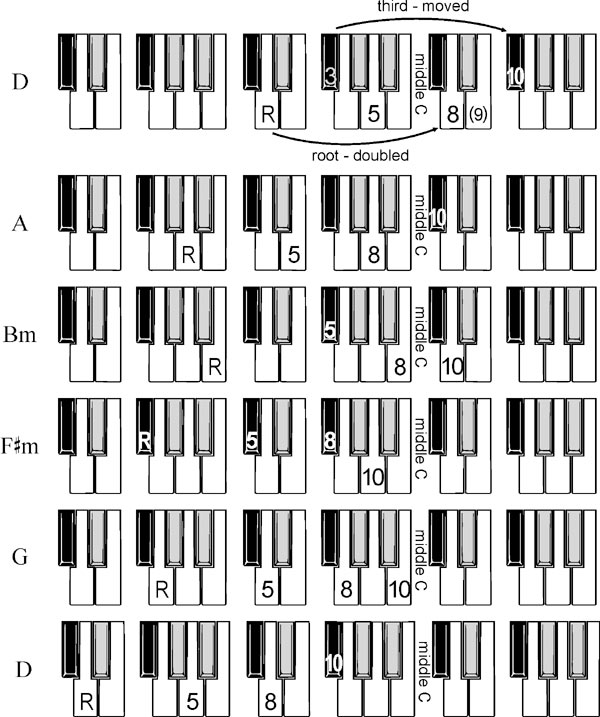
Note that:
- The tenth (10) is the third (3), but an octave higher. (We call it the tenth to remind us it’s above the octave.)
- The octave (8) is the root (R), but an octave higher.
Find the root, fifth, octave and tenth, in that order, of all the chords in the Canon chord sequence. Play the root (R) with the left hand, and the fifth (5), octave (8) and tenth (10) with the right hand.
Practising R, 5, 8, 10 patterns
Here's the teaching video for this section of the module.
We will be using this accompaniment a lot in the Canon Project, so you need to know it well. Practice playing the pattern L, R, R, R until you can play along with this practice-speed audio track.
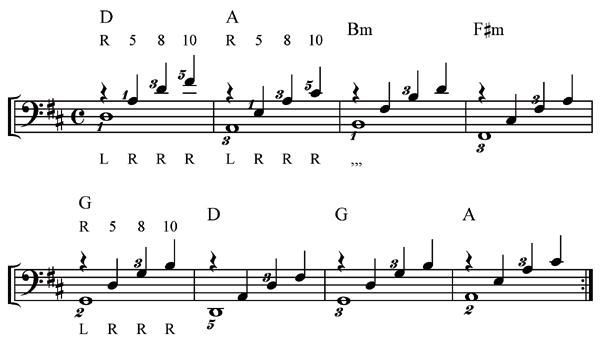
There is a lot of information in the illustration above. Reading from the top, you see the chord symbol (D, A etc.), then the chord tone order R, 3, 5, 8. Then comes the actual music, with fingering, and lastly the reminder to play the notes one with the left hand and three with the right (L, R, R, R).
Finding the notes is your first priority, but you should also be trying to use proper/bass line fingering. Here is the bass line with the fingering given in the music above.
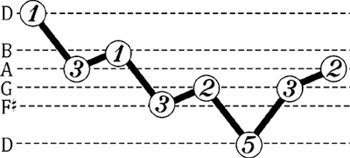
You can use your own preferred fingering if you wish, but always start on LH1 on the top D and get down to LH5 for the bottom D and back up without running out of fingers.
In this accompaniment pattern, the right hand always uses fingers 1, 3, 5 to play the second inversion chord. If you make the octave (8) your ‘target note’ when you move to a new chord and always put your right hand third finger (RH3) over it, your right hand thumb (RH1) and little finger (RH5) will be in the right place almost automatically.
Here’s an exercise for that.
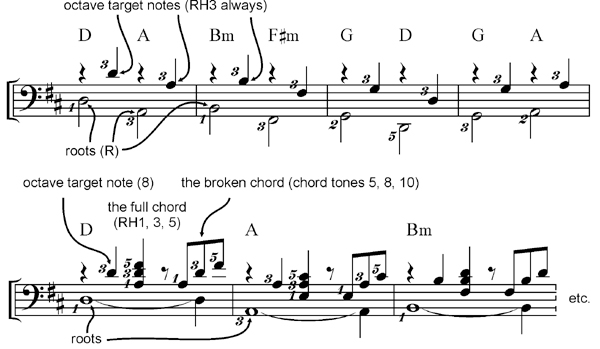
Now go back and make sure you can play CPM_M7_06 without mistakes or delays.
Playing the accompaniment pattern different ways
One really good way to get to know the notes of the accompaniment pattern is to split them up between the hands in different ways.
Run through the chord sequence using these three different combinations.
Type One: Play the root with the left hand and the other three notes with the right (L, R, R, R)
Type Two: Play the root and the fifth with the left hand, and the octave and tenth with the right (L, L, R, R)
Type Three: Play three notes with the left hand and just one with the right (L, L, L, R)
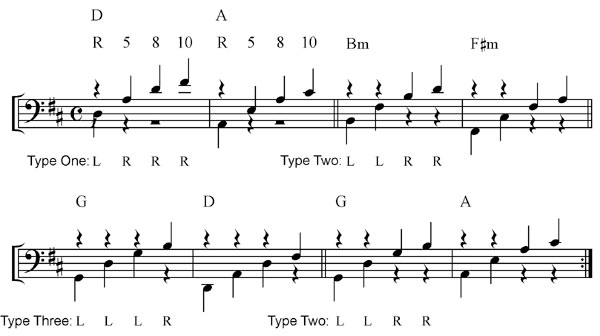
Two bars of each type are shown in the music, but you should play whole choruses (8 bars) of each type, as demonstrated in the MIDI performance file.
This exercise might seem like ‘just extra work’, but experience shows it is very effective preparation for playing the accompaniment with the left hand alone. For clarity, the notes are all shown as one-beat crotchets, but you should try to make your fingers ‘sticky’ and layer the notes up to make a four-note stack by the end of each bar. You will see this in the MIDI performance on MidiPiano.
Enjoy your accomplishment! Play R, 5, 8, 10 patterns through the entire chord sequence in time with a backing track (as in the audio track, below) or up-to-speed classical Canon recordings or YouTube performance.
The chord sequence repeats, so you can easily join in again if you lose your place.
Playing duets with this accompaniment
If you know somebody else who is also working through the Musicarta Canon Project, or are working through the project with a teacher, you can play the Canon as a duet.
In duets, the treble (top) part is called the ‘primo’, and the bass accompaniment is called the ‘secondo’.
One person (‘primo’)
can play any of the patterns from the previous Canon Project modules with two
hands in the treble, while the other person (‘secondo’) plays the accompaniment
pattern in the bass – using any combination of left and right hands.
There is some written-out duet music in your Workbook.
In the music, the primo part is written on one treble clef stave and the secondo part on the bass clef stave. For both parts, right hand notes are written stems-up and left hand notes, stems down.
For variety, the secondo (accompaniment) player can play different combinations of left hand and right hand notes as drilled in the previous exercise and demonstrated in the MidiPiano performance video.
The primo player can take the opportunity
to showcase any new variations discovered in the course of learning. The secondo player will provide an accompaniment that doesn't leave too many 'bald patches'.
|
OUT NOW! |
THE MUSICARTA BEAT & RHYTHM WORKBOOK At last! An effective approach to keyboard rhythm & syncopation skills. Learn more! |
ONLY $24.95! |
THE MUSICARTA
|
The MusicartaA methodical approach to keyboard syncopation for
|
PUBLICATIONS
exciting keyboard
creativity courses
CHORDS 101
WORKBOOK

~HANON~
video course

Musicarta
Patreon
PENTATONICS
WORKBOOK
video course

Creative Keyboard
video course

BEAT AND RHYTHM
WORKBOOK

- Volume 1 -

12-BAR PIANO
STYLES WORKBOOK

MUSICARTA MODES
WORKBOOK
PIANO STYLE
CANON PROJECT
video course

VARIATIONS
video course

- Piano Solo -
video course

- Piano Solo -


YouTube playlists


 THE LOGO
