Greensleeves ~ Lesson One
The Melody
In Greensleeves Lesson One, you learn to play the melody with the right fingers as a secure basis for your performance going forward.
The teaching video
Here is the all-in-one teaching video. You may find it more convenient to learn section by section, as below.
The same video split up into convenient sections follows.
If for some reason videos do not display correctly, use this Lesson One MMYT playlist as an alternative.
You are learning just the right hand melody in this lesson. Don't try to play the left hand chords yet!
The first line of music
Here is the first line of music, which you are about to learn.

Learn the music with this video, then play along with the chords (second part of the video).
The second line of music
Here is the second line of music. It starts the same but ends differently.

Learn the second line of the melody with this video, and play along (just the melody) with my performance
The first half of Greensleeves
Here are lines one and two combined - the first half of the piece.
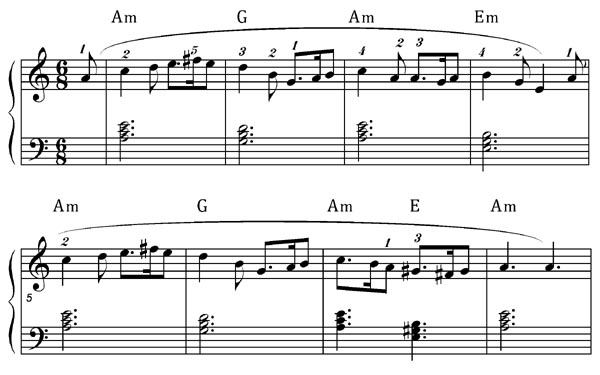
The music shows the chords as well, but you are only interested in the melody (top stave) for now.
Use this video to make sure you can play lines one and two together.
Second half - line three
Here's line three of the music, and the teaching video.

Only the first bar is different to Line One, but that makes the fingering for the rest of the line different.
Line four
Here is line four, the last line of music, and the teaching video.

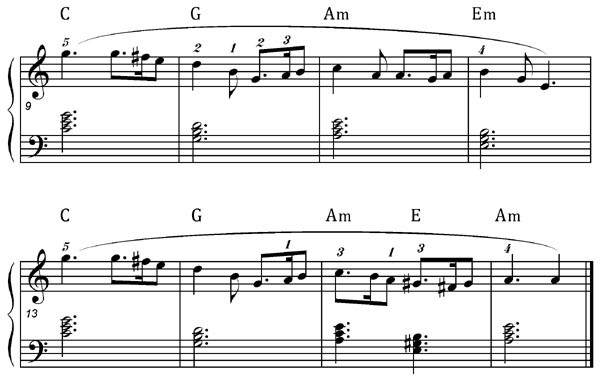
Second half of the piece
Putting lines three and four together.
Playing all the way through
Here's the music for the whole piece. Practice playing along - just the melody! - using the video beneath as a soundtrack.
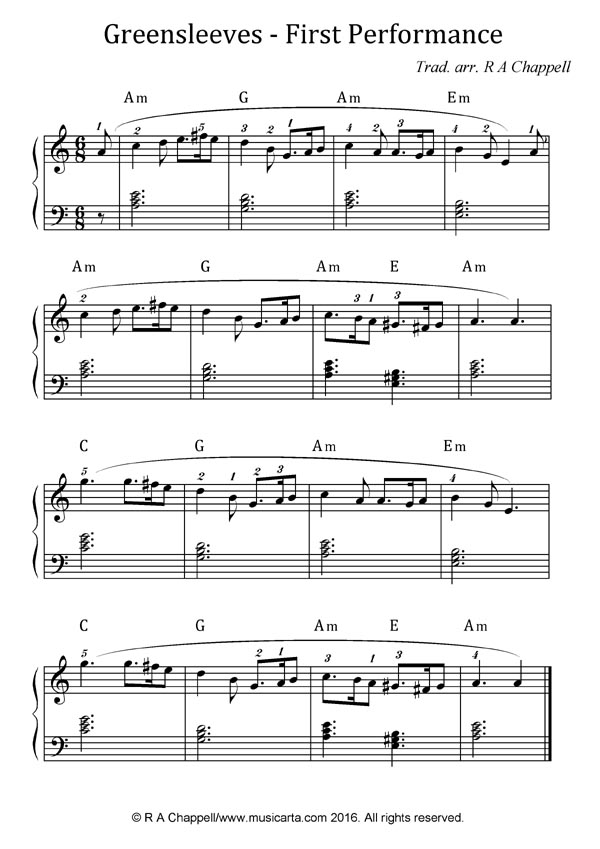
(This music is in the download folder.)
Outro
How did that go? Did you enjoy yourself? Did you play the tune right through?
Here's an admission: Rome wasn't built in a day! You may need to come back to this lesson more than once to reinforce your ability to play the melody, but it will be worth it - we want that melody secure when we start adding chords in the next lesson.
The fingering lecture
It can really seem like 'too much' to use the 'right fingering' when you're struggling to find the notes and get your fingers to do what you want them to already. But if you don't have the fingering, you can't get to the notes, which means you can't play the music wanted to play. And it's much easier to learn the right fingering than unlearn the wrong fingering later.
Visualisation
You don't have to be at the keyboard to practice the piano! You can do visualisation exercises anywhere. Just close your eyes, visualise the keyboard with its groups of three and two black keys. Head for a group of three and put your right hand thumb on the right of the two white keys in there - and off you go! (Right fingers too, please!)
This is the end of the free lesson in the course. I hope you'll sign up and do the rest! If you've learned to play the melody, I'm sure you can learn the left hand chords in the next lesson and come away playing a solo arrangement of Greensleeves.
Then you can take it onward into the 'creative stuff' and become a composer-arranger in your own right.
Now go on to Lesson Two - Adding the Chords.
Thanks for visiting MUSICARTA! Come again soon!
|
OUT NOW! |
THE MUSICARTA BEAT & RHYTHM WORKBOOK At last! An effective approach to keyboard rhythm & syncopation skills. Learn more! |
ONLY $24.95! |
GREENSLEEVES |
The MusicartaA methodical approach to keyboard syncopation for
|
PUBLICATIONS
exciting keyboard
creativity courses
CHORDS 101
WORKBOOK

~HANON~
video course

Musicarta
Patreon
PENTATONICS
WORKBOOK
video course

Creative Keyboard
video course

BEAT AND RHYTHM
WORKBOOK
- Volume 1 -

12-BAR PIANO
STYLES WORKBOOK
MUSICARTA MODES
WORKBOOK
PIANO STYLE
CANON PROJECT
video course
VARIATIONS
video course

- Piano Solo -
video course

- Piano Solo -


YouTube playlists


 THE LOGO
