Patreon MUSICARTA Premium
Two-octave Scales
This page is part of the Musicarta Patreon 'Scale City' offering. If you have not already done so, browse the series home page for orientation, and work methodically for maximum benefit.
You should already have worked through the previous (one-octave scales) page.
Two-octave scales - hands separately
First, build up to two-octave scales one hand at a time.
Now go on to tackle two-octave scales, hands together.
"From middle thumbs"
Many pupils go wrong half-way through two-octave scales, where the fingering pattern starts again. Pupils try to get over this by trial and error – ‘taking a run at it’ and hoping for the best. This is not an efficient way to learn.
Here's the two-octave C major scale with the hand-over zone highlighted.

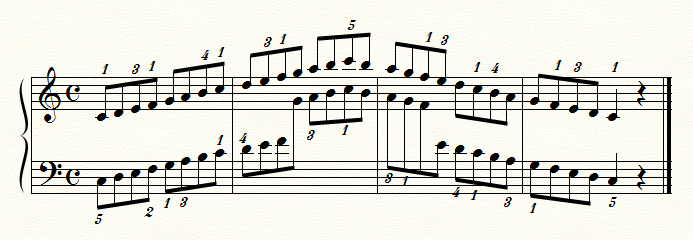
Musicarta tackles the problem head on with a scale practice pattern for Group One scales (C, G, D, A, and E) called ‘From Middle Thumbs’. You learn the two-octave scales from the spot where things usually go wrong – the middle of the two-octave scale where the thumbs play together – so you know the hardest part best of all.
Here's the full-length teaching video.
Optionally, work through the steps one at a time.
1. ---------------------------------------------------------------
Put your thumbs on ‘the middle C’s’.
When you play two-octave scales in C and the sharp keys to E, the fingers either side of those middle thumbs are fingers 2 and 4.
Rotate around the middle thumbs playing ‘true scale fingering’ fingers 2 and 4, where they are supposed be – although ‘you don’t really need to’.
Play hands separately first - right hand, then left hand.

Then hands together. Start going down as well as going up. Keep a firm every-four-notes stress going.

Watch your hands carefully to make sure you are actually using fingers 2 and 4 and not some other fingers that feel a little easier.
2. ---------------------------------------------------------------
Next, add the third finger either side of that. The finger threes always play at the same time in these scales.
PLAY HANDS SEPARATELY FIRST - the video shows right hand, then left hand.

For hands together, practice one way only first - first, up from 'the middle C's', then down.

Then both above and below. You can set off either way - up or down.

Repeat this over and over to get your hands used to the feeling. Keep watching carefully to check you’re still putting finger 4 over the thumb. You don't actually need to - three would do, but we're practicing real scale fingering.
For variety, here's a little 'tune' made of the movements we've rehearsed so far.

Take the opportunity to do some aural work. The 'tune' goes:
"Up a second*, down a second, up a second, down a second, up a third, down a third, up a third, down a third, up a second, down a second and finish."
*Note that we use 'intervals' - a second, third, fourth or fifth - to describe the vertical distance here. Intervals use 'inclusive' counting - the tonic is 'one', not 'zero', so one note up is a second (counting both notes).
Mathematically, you could write:
U2 + D2 + U2 + D2 + U3 + D3 + U3 + D3 + U2 + D2 (and finish)
You could combine these any number of different ways. For example, what would this combination sound like?
U2 + D2 + U3 + D3 + U2 + D2 + U3 + D3 + U2 + D2 (and finish)
(It's the same number of ups and downs a second and a third, but rearranged.)
- Sing it to yourself.
- See it your mind's eye.
- Play it (with the right fingering!)
Here's the audio of that combination:
There's a whole page dedicated to 'From the Middle' patterns. You will use them in all keys to learn and practice the fingering of two-octaves-and-more scales.
3. ---------------------------------------------------------------
The next note to add – both up and down – is the ‘thumb under’.
You’re now playing up and down four scale degrees ('a fourth'). Note that it helps to stress the notes in threes - One-and-a-two-and-a, One-and-a-two-and-a, ...
Practice HANDS SEPARATELY first!

Now practice hands together in one direction (up or down) at a time.
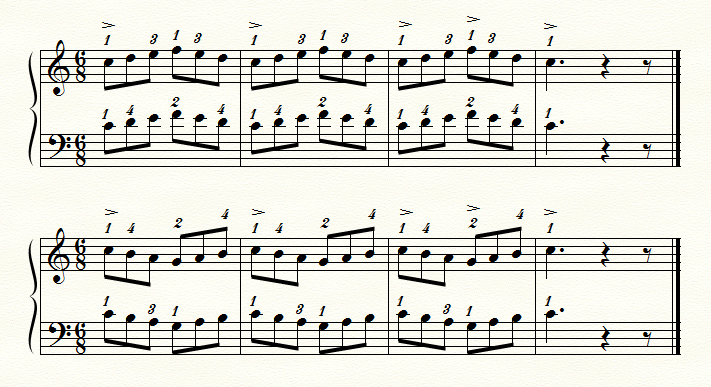
When one hand is playing the ‘thumb under’, the other is using finger two – check visually that this is the case.
Then play the whole drill two-handed.

4. ---------------------------------------------------------------
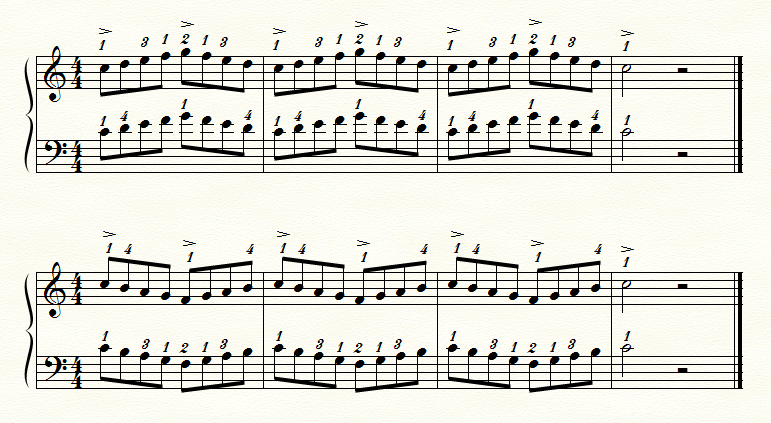
Add one more note to complete a fifth above and a fifth below.
One more note either side puts the emphasis back in groups of four notes.
Play the HANDS SEPARATELY first.

Play this segment with two hands.

If you need more preparation, or have got a little rusty, play the one-direction-only-first option a few times.
5. ---------------------------------------------------------------
Jump to seven notes either side - to one note before the octave. That's six notes distance, so we're back in six-eight. (Count "One-and-a two-and-a".)
- Practice hands separately first,
- then only-direction only,
- then hands together.

All this repetition is good on its own merits! Expertise at the keyboard is accumulated from hours spent 'just doing it'!
Of course, you have to listen hard too, so your playing improves as regards
- accuracy,
- evenness, and
- speed.
And keep that rhythmic pulse going!
6. ---------------------------------------------------------------
You're now primed to play your two-octave scales - but we'll stick to starting from the middle for now.
Here's the video for this section, but you might find it more convenient to play from the segments which follow.
Before the segments, here is the all-in-one scrolling MS video.
The segments
|
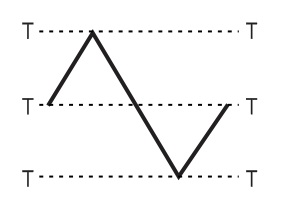
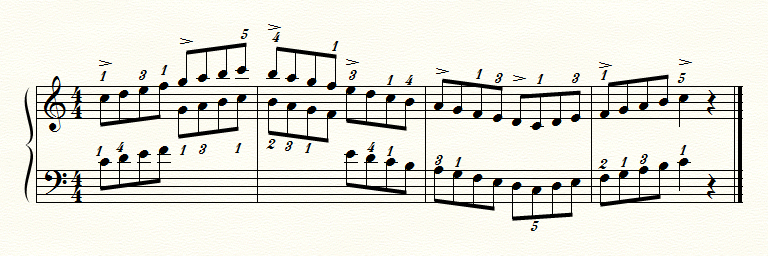
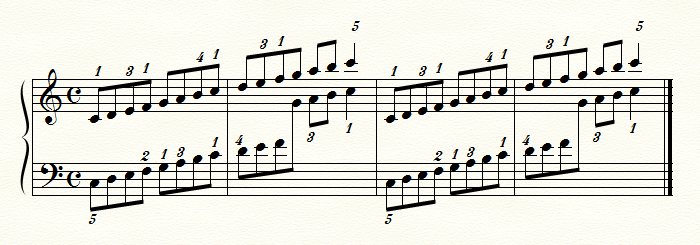
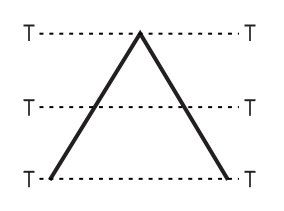
Here are two from-the-middle scale practice pattern contour diagrams to follow - one starting up and the other starting down. The first pattern covers a length of four octaves - one up, two down and one up - so it naturally 'comes out' if you stress in fours. Try playing from the audio example plus the 'contour diagramme'. Video and MS below. |
 |
|
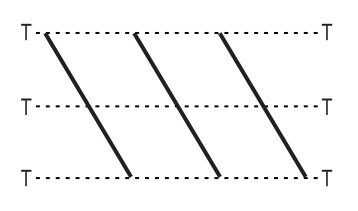
The second pattern covers a length of six octaves (count them - between the T-for-tonics) - so it's best stressed in threes or sixes. |
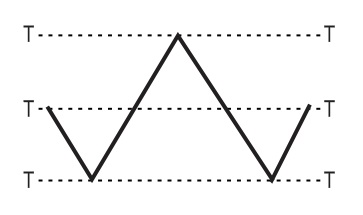 |
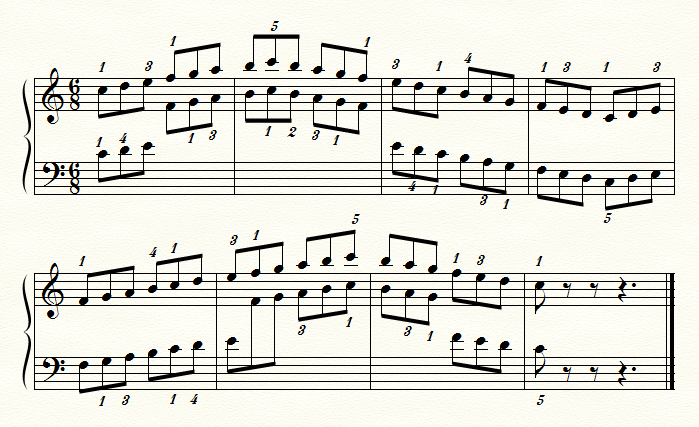
|
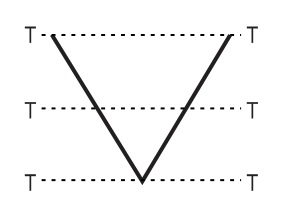
Note that you could play both these patterns starting in the other direction. Try to work from the audio examples and contour diagramme. |
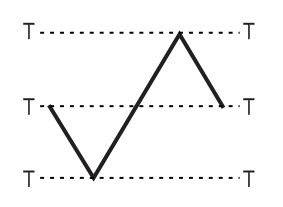 |
|
The other pattern, inverted. Six octaves length - stress in threes. |
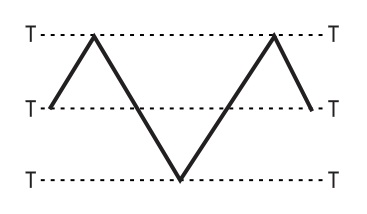 |
|
Now play your two-octave C major scale rising from the bottom to the top. Play at your own speed! If the example audio is too fast, go slower! Methodically building your own skills is much more important than 'keeping up'. |
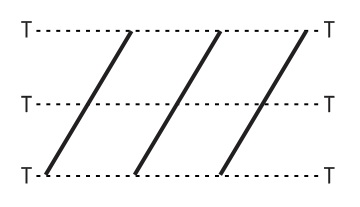 Make sure to carry your 'middle thumbs' expertise through into your playing. |
|
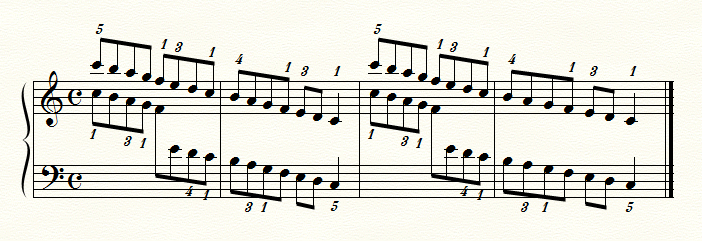
Play the scales falling two octaves from the top as well. Notice how your confidence in the tricky middle thumbs area has improved. Keep a 'beat' going. Challenge yourself to get back up to the top in time and start again crisply. |
 |
|
Finally, play the scales up two octaves and down again - the 'usual' pattern. The pattern covers (a length of) four octaves, so stress in fours ("ONE-and-and-a TWO-and-and-a THREE-and-and-a FOUR-and-and-a...") to carry you through to the end of the pattern. |
 |
|
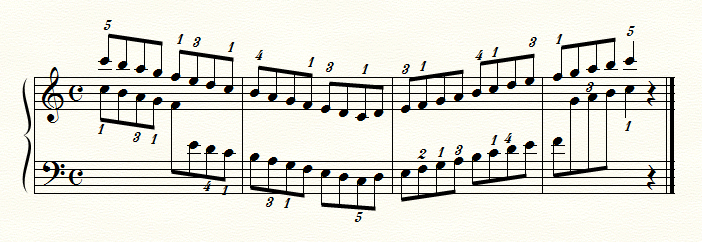
Play from the top as well. |
 |
Finally, see if you can keep up with the all-in-one video (repeat).
You can use all these patterns with the same fingering in G, D, A and E majors. 'All you have to do' is remember to use the sharps/black keys indicated in the key signatures!
Go on to the Two-octave Sharp Majors page to see the patterns demonstrated.
Thanks for learning with Musicarta! Come back soon!
|
Musicarta Patreon
SCALES SERIES
Reference
Scale fingering
Scale Practice Patterns (SPPs)
Scale-tone practice patterns (STPPs)
Chromatic Scales
Diminished Scales
|
The MusicartaA methodical approach to keyboard syncopation for
|
PUBLICATIONS
exciting keyboard
creativity courses
CHORDS 101
WORKBOOK

~HANON~
video course

Musicarta
Patreon
PENTATONICS
WORKBOOK
video course

Creative Keyboard
video course

BEAT AND RHYTHM
WORKBOOK
- Volume 1 -

12-BAR PIANO
STYLES WORKBOOK
MUSICARTA MODES
WORKBOOK
PIANO STYLE
CANON PROJECT
video course

VARIATIONS
video course

- Piano Solo -
video course

- Piano Solo -


YouTube playlists


