Pyramids Variations - Lesson Four
A Four-chord Version
Once you can locate Basic Music-making Position (BMP) chords on the keyboard using their name-note (root) – the lowest note in each hand – you can play an impressive- sounding ‘Four-chord Version’ of Pyramids.
Here is the performance audio for the first part of the lesson.
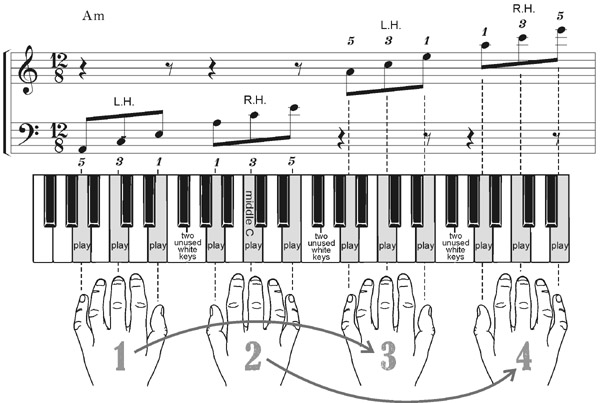
In the Four-chord Version, you play four BMP chords for each
chord symbol in the chord sequence. You start an octave lower than before, so
that with the right hand now plays in the middle of the keyboard. You play a
left hand chord (1), a right hand chord (2), a left hand chord (3) and a right
hand chord (4) all the way up the keyboard.
The twelve-eight time signature
The time signature for the Four-chord Version is ‘twelve-eight’, indicating twelve quavers in each bar. Music in twelve-eight is counted:
“ONE-and-a TWO-and-a THREE-and-a FOUR-and-a…”
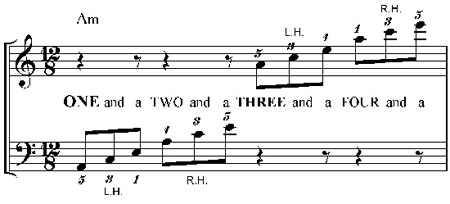
The notes in twelve-eight come at exactly the same speed as the six-eight notes in our previous versions, so each bar - and the whole performance - lasts twice as long. Count along to the music.
A ‘aerial view’ of the Four-chord Version
Here is an ‘aerial view’ sketch of the Four-chord Version lesson performance.
The sketch music is deliberately printed too small to play from, but you can still see the chord symbols and the bar numbers. Listen to the performance files for this section, and get a clear picture of the lesson performance in your mind’s eye.
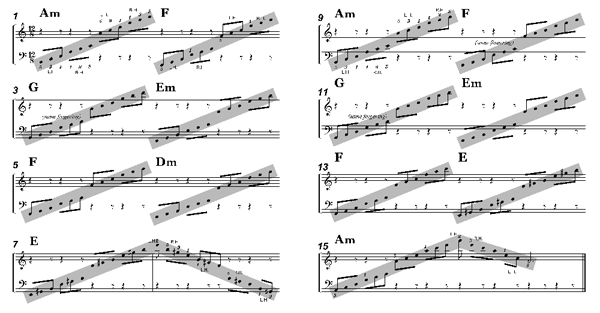
Pick out these features:
- The first half of the piece (bars 1 to 8) is on the first page; the second half (bars 9 to 16) is on the second page.
- For the first six chord symbols in each half there is a rising group of four BMP chords. These are the left hand, right hand, left hand, right hand chords played from bottom to top.
- In bars 7 and 8 (bottom line of the first page) and 15 and 16 (bottom line of the second page), there are four-bar up-and-down LH-over patterns.
Try playing the first line of the Pyramids chord sequence using 12-note four-chord patterns. Stop when you get to bar 7. We are going to look more closely at the double-length LH-over patterns next.

The four-chord LH-over patterns
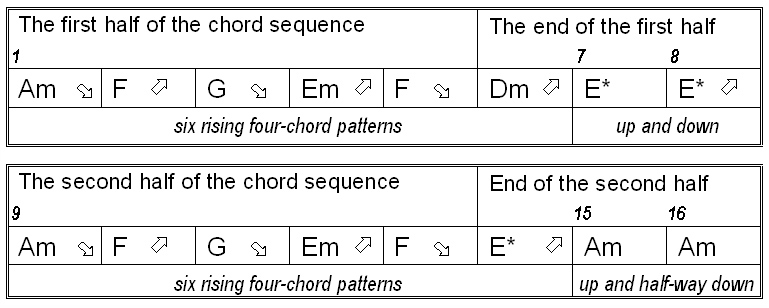
Here is the music for the four-chord E major LH-over pattern in bars 7 and 8 at the end of the first half of the piece.
The pattern is made up of:
- Four chords going up. (You can tell these BMP chords by the beams joining the groups of three notes together.).
- One LH-over note at the very top (E, the name-note of the chord).
- Four chords coming back down, but...
- ...only as far as the middle note of the last chord, to make twelve notes in the bar.

Add the four-chord E major LH-over pattern to your first half four-chord performance, then play the second half of the chord sequence (from bar 9) with four chords per chord symbol.

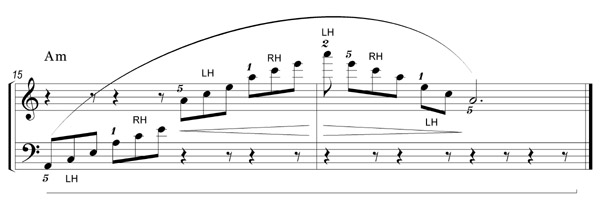
The ending, in bars 15 and 16, follows the same pattern, but ends either at the top or halfway down, as shown here.
Now you have the whole four-chord version chord sequence.
Here's the performance playing on MidiPiano.
Here's the performance with the scrolling MS.
Getting to the roots
Because the four rising BMP chords cover so much of the keyboard, it’s quite a big jump back down to the start of the next four chords. It helps to be very sure of your target note – the next root in the chord sequence.
This zigzag lines diagram shows the movement of the roots in the first and second halves of Pyramids. It is a good idea to rehearse this lowest-roots bass line to help you remember where you are in the chord sequence and what your next root note is.
More helpful information is drawn together in the four-chord version cue card in your workbook
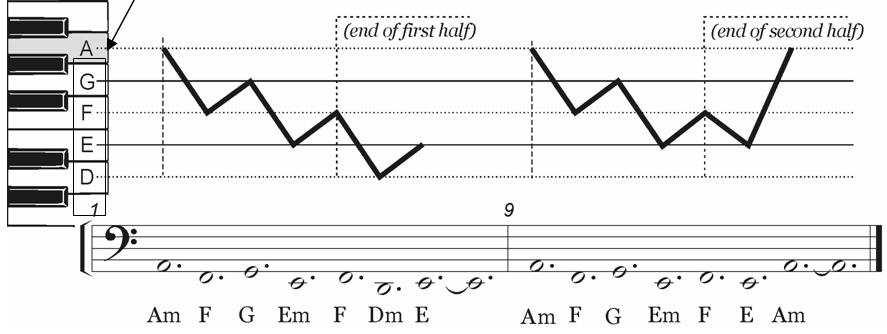
The audio file plays the first and second halves of the bass line first in the original location, then an octave lower in the Four-chord Version location.
Pedalling
To make the four-chord version sound right, you need to use your piano or keyboard’s ‘sustain’ pedal to keep important notes sounding that you can’t keep held down with your fingers – like the root notes in this version.
The main fault in pedalling is to pedal down at the same time as you play the note you want to sustain. This is intuitive but wrong – you always catch some sound you didn’t want. The correct way is to pedal just after you have played the first note you want to sustain. This is called ‘pedalling up on the beat’.
It’s quite difficult to learn ‘up on the beat’ pedalling. One good way to practise is to say out loud what you expect your right foot to do:
“UP down-a TWO-and-a THREE-and-a FOUR-and-a…”
Then you watch your foot to make sure it does what you’re telling it to do. It has to be quite a fast snap-off-and-on of the pedal, or you won’t catch your bass note.
Pedalling
is indicated in music in several ways. Sometimes you will see Ped and asterisk symbols to show when the
pedal is to be depressed and released.

Otherwise, you will find a line with spikes or gaps showing where to pedal, as in the lesson performance music here.

It’s very easy to pedal too much, overwhelming your listeners and losing your music in the wash of sound. You have to listen carefully to your pedalling and try to be ‘tasteful’.
Playing the melody over the Four-chord Version
Playing the Pyramids melody over the four-chord Pyramids version sounds very impressive.
Everything in the Lesson Three ‘Adding the Melody’ version right hand goes up an octave, and the left hand starts an octave lower. This leaves room for the two extra chords – the right hand and left hand chords 2 and 3 of the four-chord version.
Here's what the performance looks like on MidiPiano with the scrolling MS.
When you first added the melody to the chords of the Pyramids First Performance, you rehearsed the zigzag line of the new melody notes against the shape of the roots that you already knew. You saw that the line the tune makes is nearly the mirror image of the shape of the roots.
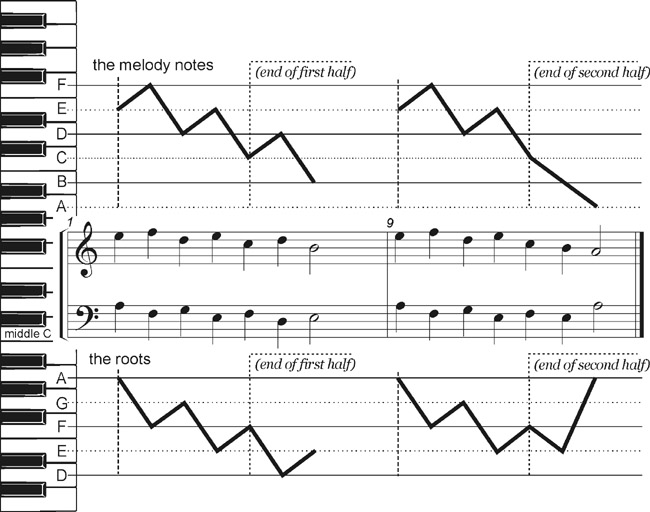
Now that you’re playing this version with an extra two octaves and two BMP chords between the hands, it’s a good idea to rehearse the roots in the left hand and the melody in the right hand again, in the place where you actually play them - with the right hand an octave higher than shown above, and the left hand an octave lower.
Use the ‘four-chord-with-melody’ version cue card in your Workbook to locate the new melody and bass-notes and rehearse the zigzag shapes. You will find it very helpful.
Play around with it a bit, as in this audio file.
Try to play the new version from the performance files and instructions alone. It doesn’t matter if your version turns out a little different.
Here's the audio performance again, to copy.
You definitely need the sustain pedal to hold the melody and roots in this version. Listen carefully to make sure you pedal cleanly, letting all the old notes go and catching the important new ones.
Now go on to Lesson Five.
|
OUT NOW! |
THE MUSICARTA BEAT & RHYTHM WORKBOOK At last! An effective approach to keyboard rhythm & syncopation skills. Learn more! |
ONLY $24.95! |
PYRAMIDS
|
The MusicartaA methodical approach to keyboard syncopation for
|
PUBLICATIONS
exciting keyboard
creativity courses
CHORDS 101
WORKBOOK

~HANON~
video course

Musicarta
Patreon
PENTATONICS
WORKBOOK
video course

Creative Keyboard
video course

BEAT AND RHYTHM
WORKBOOK
- Volume 1 -

12-BAR PIANO
STYLES WORKBOOK
MUSICARTA MODES
WORKBOOK
PIANO STYLE
CANON PROJECT
video course
VARIATIONS
video course

- Piano Solo -
video course

- Piano Solo -


YouTube playlists


 THE LOGO
