Musicarta Modes - Aeolian Two
Transposing i–ëVII–ëVI
NOTE: Some computer
systems do not represent sharp and flat signs as entered by the author. ë indicates a flat sign and ì a sharp.
Transposing chord sequences is one of the key musical skills. If you can transpose chord sequences, you really do understand the ‘inner workings’ of music harmony, and using that knowledge puts you right at the front of the field.
Download up-to-date MIDI files for this page
Transposing i–ëVII–ëVI
Let’s revise what we can say about the i–ëVII–ëVI chord group.
In Part Six of this series, we added another major chord one whole tone below the i–ëVII pairs we explored previously. This is the ëVI (‘flat six’) chord.
The roots of these next-door i–ëVII–ëVI chords are a whole tone apart..
- You have a minor chord – i
- A whole tone below that, you have a major chord – ëVII
- Another whole tone below that, you have another major chord - ëVI
Three-note chords (triads) can have any one of the three chord tones at the top, making nine chords in all.
Chords A minor, G and F are the only place on the keyboard you can find a i–ëVII–ëVI chord group using only the white keys The other two groups of i–ëVII–ëVI chords we will be using in this module use one black key.
D minor, C and B flat
D minor, C and Bë (majors) are an Aeolian i–ëVII–ëVI chord group.
- D minor is our i chord. The D minor chord is an all-white-key chord.
- Note C is a whole tone below D, and an all-white-key chord built on C is a major chord – our bVII.
- To drop a whole tone from C (to make our ëVI chord), we have to go to black key B flat, and build our ëVI (major) chord up from there. (There is no black key between white keys C and B on the keyboard, so they are only a semi-tone apart.)
Here is a keyboard diagram of the three chords in all possible inversions.
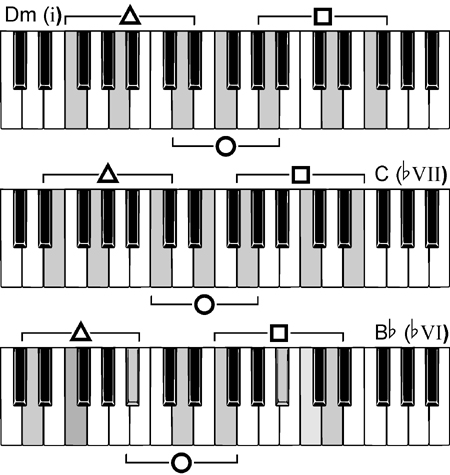
Work those Bë chords a lot! The notes look a lot more evenly spaced than the other chords/inversions, and everybody finds them a bit more difficult to pin down.
The module riff
Here is the module riff.
Here are the skeleton chords of the first part of this module riff.
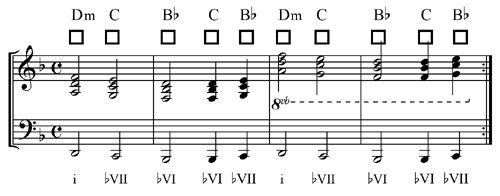
The right hand plays around middle C, which involves a lot of leger lines. The second half of the MS has the same music written an octave higher, with the 8vb (‘play an octave lower’) indication.
Notice these are all second inversion chords (square symbol, root/name note in the middle).
We will not be so concerned about playing the riff exactly as in the audio in this module. Find the inversions – any basic play-along rhythmic pattern will do.
The next audio
track offers a slight variation. Can you hear what it is?
The right hand chord doesn’t change when the bass note walks down in the first bar. You end up with what is called as ‘slash chord’. Here’s the music.
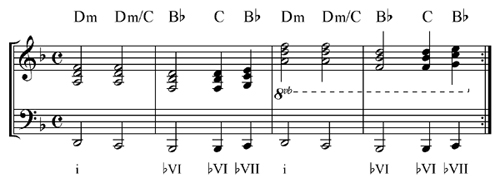
Not changing something you might expect to change, or that you changed before, is a powerful way of generating variations – and thus creating more music.
Explore the other inversions, as in the previous module. Logically you would get.
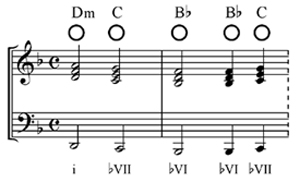
But you will remember in the previous module we said to avoid ‘parallel fifths’. So we do the same kind of thing as before and keep the top right hand note the same as the notes underneath move.
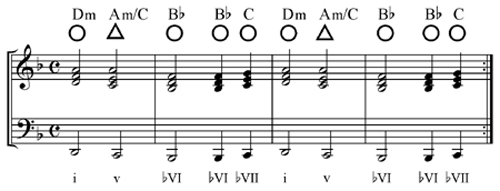
There are still a lot of root position (circle symbol) chords there, but the variation makes it sound better.
The last inversion to explore is the lowest.
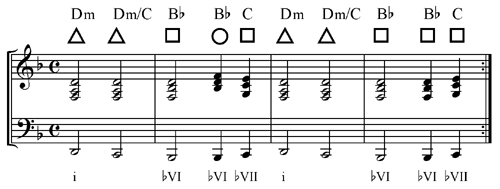
This is a very ‘mixed bag’! You cannot take the first inversions down parallel – the sound is just too low. You can hear this group chords in the second half of the previous audio clip.
If you play these three D minor i-¨VII-¨VI segments one after the other in the order they are presented in this module, you get a rhythm section backing for improvisation – or just a groove to get into. The last audio clip above goes back to the start and repeats in this way.
E minor, D and C
E minor, D and C are another i-¨VII-¨VI group of chords that uses only one black key – in this case, F sharp.
In this section you will learn how to create simple variations built around this group of chords and make a solo of a decent length, and to get your hands so familiar with the chords and the types of movement that they themselves start coming up with ideas. (Yes! This really happens!)
Here is a‘wizards and princesses’-type riff we build on E minor, D and C in this section.
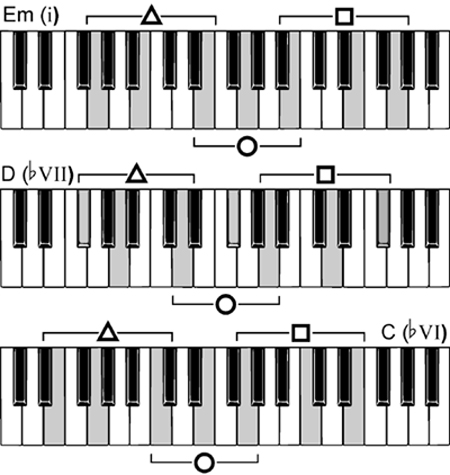
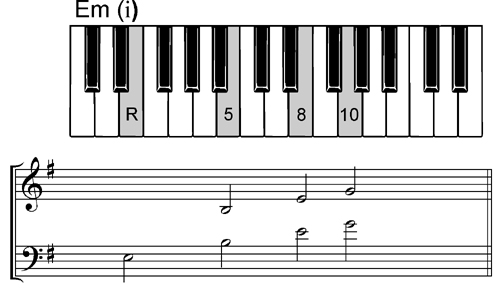
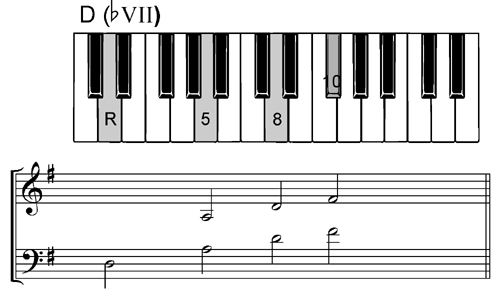
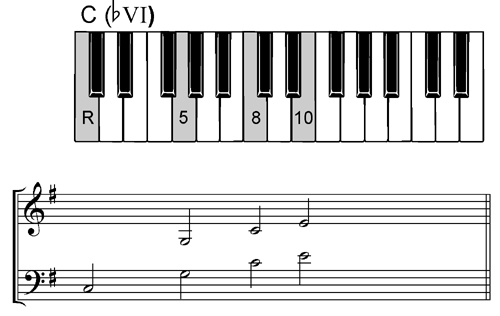
Here are the chords in a keyboards diagram.
Making accompaniment patterns from a triad
Let’s focus on the accompaniment pattern first.
The basic ‘seed’ of most accompaniment patterns is the root position triad (the circle symbol chords in the keyboards diagram above).
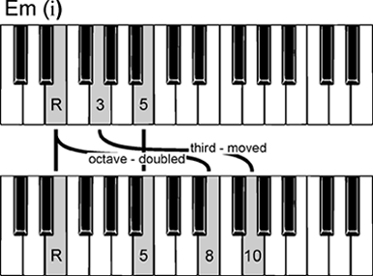
The root position triad uses the root, third and fifth (R, 3, 5) of some scale. These are the chord tones.
You can make accompaniment patterns out of the simple root position triad, but the accompaniment patterns can be made a lot more interesting by:
- ‘Doubling’ (repeating) the root at the octave, which makes it ‘8’, and
- Moving the third up an octave, where it becomes ‘the tenth’ (‘10’).
Here is that process shown on the keyboard, for E minor:
Do this with all three triads (as shown below). You can use two hands to play the accompaniment pattern (for now).
This audio clip demonstrates the process, and the three root-fifth-octave-tenth (R-5-8-10) accompaniment set of chord tones in all three chords.
The fifth, octave and tenth are shown written in both the bass and treble clefs. These are the same notes.
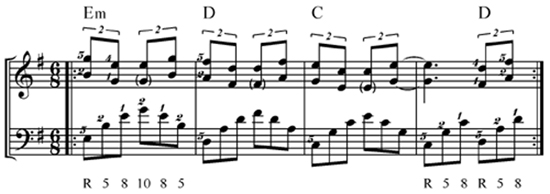
If you just played the notes up and down, you would get a pattern in six-eight. We’ll use the same chord sequence as for the previous riff.
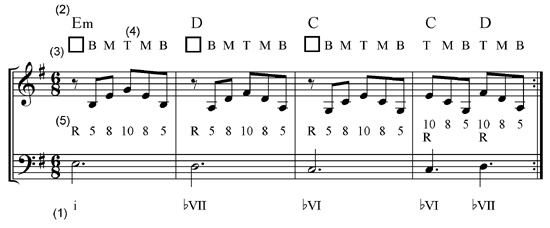
Take time to read the information around the notes – it shows how real musicians think when they ‘just sit down and play’, improvising riffs like this.
1. Below, you see the I–ëVII–ëVI coding. What this indicates is:
“A minor chord (i) with a major chord a whole tone below (ëVII) and another major chord a whole tone below that (ëVI).
2. At the top, you see the conventional chord symbols. Given any particular minor chord – in this case, E minor - top musicians will be able to hear the possibility of a I–ëVII–ëVI sequence and will know what the ëVII and ëVI chords will be (D and C majors, in this case). You should expect to be able to do the same – it sounds more complicated that it is!
3. You also see the inversion symbol – all squares, for second inversions (root in the middle).
You will normally avoid parallel root positions because of the harsh ‘parallel fifths’. Parallel first inversions aren’t very interesting because the top note is the same as the bass note (the root).
The parallel tenths sound you get from second inversions with the third, or tenth, at the top) is the nicest. This is not a hard and fast rule. See if you agree!

4. Also above the music is the ‘BMT analysis’. This tells you the order in which the bottom, middle and top right hand inversion notes are used to fill up the bar.
5. In between the staves you see the chord tone shorthand – root, fifth, octave and tenth (R-5-8-10). Our ‘top musician’ knows to use these notes in broken chord patterns selected according to the style of music from a ‘memory bank’ of accompaniment patterns (like this one) built up over the years. He or she knows the chord, selects the inversions and ‘waggles the fingers’ according to the pattern they have in mind.
Work through the process often enough and you’ll do that too!
Make the accompaniment pattern (repeated below) as beautiful as you can. Music doesn’t have to be complex to be beautiful, but you do have to decide to make it beautiful.
Make the bass line sing out. Make the highest notes stand out with a bit of extra ‘push’ and some ‘sticky’ to make them last longer.
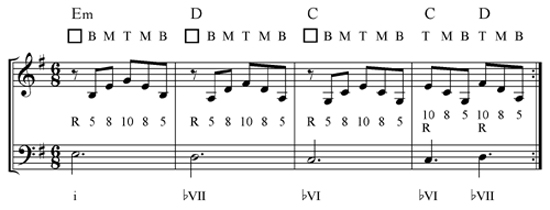
The accompaniment pattern above uses both hands. That’s fine if you just want to ‘strum’ the piano and wait for ideas, or accompany someone. But if you’re going to play a melody as well, you have to play the accompaniment with one hand.
It’s easy to do if you get the fingering right.

As you can see.
it’s a simple formula. Here's a schematic (you can't actually play this).
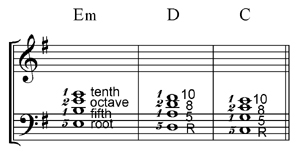
Left hand finger 5 plays the root, 2 plays the fifth, the thumb plays the octave and ffinger 2 comoes over to play the tenth (third).
Then, as pointed out in bullet point 3 above, atune built on the tenths will sound good. The following music MS and sound clip demonstrate.
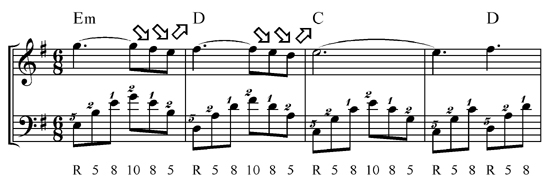
The tenths, now in the right hand also at the start of each bar, are joined by little two-note runs of next-door notes. Next door can be either up or down. The arrows show which way you move – up or down. The second time these four bars of music appear, the up/down profile is slightly different. This makes the music more interesting for the listener.

The right hand thumb joins in with a few notes. The left hand carries on playing the accompaniment pattern. You hear all this in the audio clip above.
Of course, you can always play just chord tones in the right hand. Try following this BMT analysis (second inversion chords throughout):

The audio has the left hand accompaniment carrying on underneath, but the right hand part sounds good under simple bass notes. Listen to the following sample. Count off the six quavers in the bar and decide where the bass (left hand) notes – all roots – come.
Next, we combine part of the broken chord pattern with the melody.
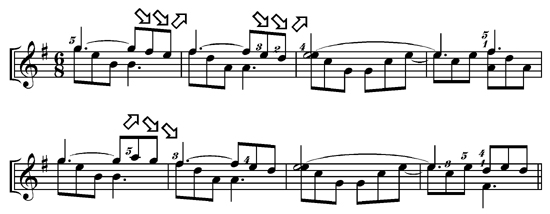
Next, the melody appears at the bottom of the right hand, with the added notes above. You have to be clever to keep you two hands out of each other’s way.
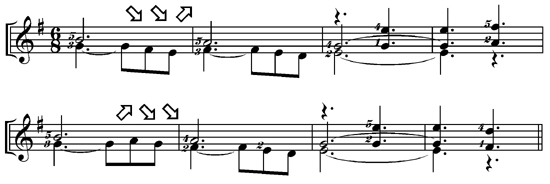
The audio clip fades out with this advanced tuplet figure:
Substitute something simpler if this is too difficult for you right now.
Summary
In this section you have seen how:
- A simple chord can be expanded into a broken chord accompaniment and a chord sequence played using the pattern;
- A melody can be made by stringing chord tones together with varied next-door note patterns;
- Broken chord figures can be played in the treble (right hand) over broken chords in the left hand as well;
- The same music played an octave higher or lower is not a boring repetition, but can easily sound like new material altogether;
- These variations can be strung together to make a decent length solo with the promise of more to come!
- The Aeolian mode provides a trio of chords (I–ëVII–ëVI) that is ideal for improvisations of this sort.
In the next module, you will practise harmonising tunes with the three Aeolian chords you know, and learn new techniques for putting together great riffs. You will be amazed at how much music three simple chords can generate!
|
OUT NOW! |
THE MUSICARTA BEAT & RHYTHM WORKBOOK At last! An effective approach to keyboard rhythm & syncopation skills. Learn more! |
ONLY $24.95! |
MODES |
The MusicartaA methodical approach to keyboard syncopation for
|
PUBLICATIONS
exciting keyboard
creativity courses
CHORDS 101
WORKBOOK

~HANON~
video course

Musicarta
Patreon
PENTATONICS
WORKBOOK
video course

Creative Keyboard
video course

BEAT AND RHYTHM
WORKBOOK
- Volume 1 -

12-BAR PIANO
STYLES WORKBOOK
MUSICARTA MODES
WORKBOOK
PIANO STYLE
CANON PROJECT
video course
VARIATIONS
video course
- Piano Solo -
video course

- Piano Solo -


YouTube playlists


 THE LOGO
