Musicarta Modes - Aeolian Three
Harmonising with I–ëVII–ëVI
NOTE: Some computer
systems do not represent sharp and flat signs as entered by the author. ë indicates a flat sign and ì a sharp.
This Musicarta Modes workbook module practises harmonising using the rich Aeolian three-chord set explored in the first two Aeolian modules.
Download up-to-date MIDI files for this page
Harmonising at the keyboard
The essence of the practical musician’s skill is to find chords from a certain set – usually a key but in this case a modal chord family – to harmonise a melody. By ‘harmonise’, we mean “find a chord which ‘supports’ the melody note” – and hang it underneath that note. The melody note will be the top of the three chord tones.
The top line/melody to harmonise is this.

Our key is A Aeolian, and for the moment we will use just the I–ëVII–ëVI Aeolian set of three chords from the previous modules. In A Aeolian, I–ëVII–ëVI are A minor, G and F majors.
Think about which chords to use to harmonise the top line given.
- The first note is C. Note C is a chord tone of both the F (major) and A minor chords in our set. You can harmonise C with either an A minor or an F chord – that is, you can hang either an A minor or an F major chord underneath the note C.
- The next note is B. Only chord G from our limited Aeolian set has B as a chord tone. The chord must be G.
- The next note, A, can be harmonised with either an A minor or an F chord.
- The next note, E, can only be harmonised with an A minor chord (out of our limited set).
- The next note, D, can only be harmonised with a G chord.
- The next note, C, can be harmonised with either an A minor or an F chord.
- The last note is B, which can only be harmonised with the G chord.
So the possibilities are:.

Let’s work with just four possibilities to start with: 9

Your first job is to find inversions of those chords – including the alternatives for melody notes A and C – which have our melody notes at the top. Play along with the audio files. Read the next section also for help, if needed.
Using inversion symbols to help
The circle/square/triangle inversion symbols help you think about what shape your right hand should make.
Think it through. Your right hand only plays three chord shapes – root position, first inversion or second inversion. As we are in A Aeolian – which only uses the white piano keys – we can find our chord shapes with “play one, miss one, play one” white-key counting.
Study this
diagram.
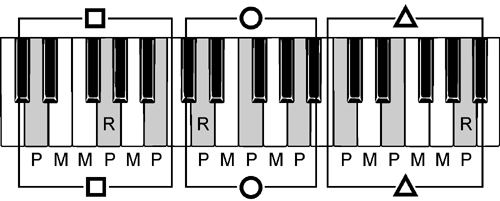
P stands for ‘play’. M stands for ‘miss’. We are not interested in what actual chords these are. We are only interested in their ‘play one, miss one, play one’ shape.
Read through the following statements.
- Any two triad chord tones in A Aeolian (an all-white-key mode) have either one or two missed white keys between them – P M P or P M M P.
- Triad chord tones are either equally spaced – the play one, miss one, play one, miss one, play one root position chord, or
- One pair of notes is closer together (play one, miss one, play one) and the other note is two missed keys away – a first or second inversion chord.
- The root position chord covers five white keys; the two other inversions cover six white keys.
Here is that information in a table:
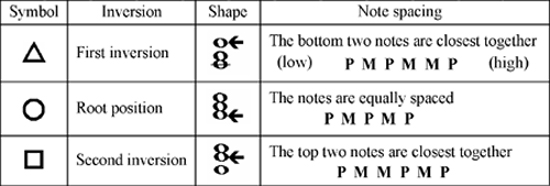
The name-note (or root – arrowed in the table) is the capital letter in the chord symbol. It’s either the top (first inversion), the bottom (root position), or the middle note (second inversion) of a triad.
In this riff, the melody note is always the top note of the three-note chord. Put your right hand little finger on the melody note and try the three shapes. One will have the chord name-note in the right place. That’s your chord.
Here are the four chord sequences repeated for your convenience:

Play along with the four chord-sequence audio clips above, then go on to the next section.
Whole-bar BMT variations
Our chord sequence has the chords lasting a whole bar – four crotchet or eight quaver counts.

Broken chord patterns are usually quaver patterns. The simplest broken chord patterns have right hand quavers on every count, making a total of eight quavers to the bar.
Pattern 1
Here’s a broken chord pattern to use on Chord Sequence 1.
The pattern is T B M B T B M T – shown here for any second inversion chord (root arrowed. The stave lines have been taken away to help you think of this as ‘a pattern anywhere’.
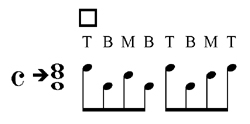
In the audio performance, the first four bars have a pedal bass note A; the other four bass notes are all roots. Simplify the tricky bass rhythm if you like.
Pattern 2
Here’s another BMT pattern, used on Chord Sequence (3).
The pattern is T M B T M B M T – shown here for any second inversion chord (root arrowed).
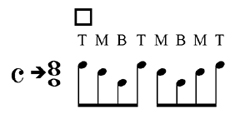
The audio performance uses a pedal bass note A all the way through.
Pattern 3
Once there are gaps – quaver slots with no notes – the rhythm is ‘syncopated’. Here is a syncopated pattern from Module Five.

If you apply that texture to our Chord Sequence 1, you will get something like this.
Pattern 4
Also from Module Five.
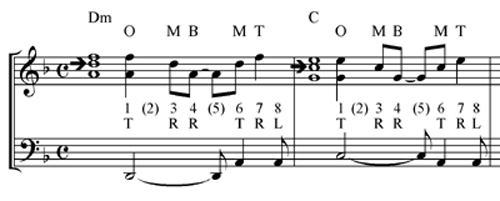
If you apply that pattern to Chord Sequence (2), you will get the following music.
Minim BMT variations
The chords could change twice as quickly, using two chords in each bar. Each chord will then only have four quaver beats.
Pattern 5
Here is a two-chords-per-bar pattern using Chord Sequence 1.

Listen to the audio file and see if you can play it.
Note that the BMT analysis is simplified a little – some additional chord tones are ‘thrown in’. the BMT analysis refers to the top notes of the triads. You will start to fill out the patterns with extra chord tones as you understand the technique better – and you can get your fingers there in time.
Note also that the second chord in each bar is always anticipated (brought forward a quaver - your ear should tell you.). The chord symbols have been brought forward over their actual T (for top note) symbol to help you.
Pattern 6
Try learning the next pattern from just the BMT analysis and the audio.
This uses our Chord Sequence 1 as well.
Remember: ‘O’ stands for ‘outside’ – play the top and bottom (outside) notes of the three-note inversion indicated by the circle/square/triangle symbol.
Here’s the music for the example:

Mixing Patterns and Chord Sequences
Try applying Pattern 6 to Chord Sequence 3
Here’s the music for that version.

Experiment! Feel free to make any alterations ‘good taste’ seems to require.
Here’s a version of that riff which is slightly ‘tweaked’, to deal with some harshness in the last bar. Can you hear what’s happened?
Melodic variation
As well as making variations by experimenting with rhythmic broken chord patterns, we can make the melody line more interesting by using next-door notes, as we did in the Module Six riff
The Module Six riff uses our Chord Sequence 1.
For melodic variation, it uses only the next note above the top chord tone. If we want to use the next note down as well, we need a down-arrow symbol as well.
Our full set of symbols is shown here.
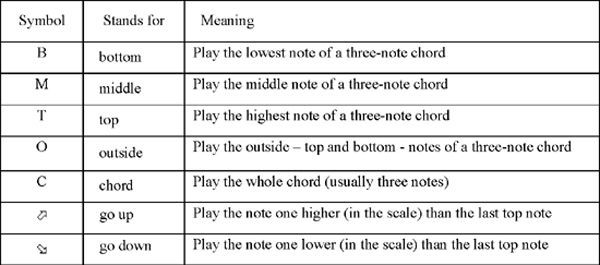
(The new symbol is at the bottom.)
To recap, the Chord Sequence 1 chords are:

For now, we are just interested in the right hand, and we want to separate (in our mind) the top (‘melody’) note from the other two chord tones.

Don’t forget to look at those Roman numerals from time to time. Thinking about chords in the Roman numeral system – and actually hearing the chords play in your head as you do it! – should be your ultimate aim.
Now suppose we play around, using next door notes to get from one top note to the next. We can go up or down. Here’s one possibility – without thinking about the rhythm, for the moment.

Use the fingering given so that you don’t keep running out of fingers. Playing like this at the little-finger side of your right hand is essential in the modern keyboard style.
The actual performance (in the next audio clip) uses this rhythm.
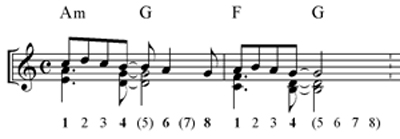
The rhythm is the same in the second half.
Here’s a melodic variation on a new chord sequence.:

Practice using the next-door note melodic variation technique on the other module Chord Sequences. Feel free to change a note or two here or there to satisfy your artistic imagination!
The last two modules in the Musicarta Modes workbook has taken time out from adding new chords to our modal set to show you how you can get the most out of the chords you have learned.
This is the method that has been demonstrated.
- You take a simple set of chords and use the inversions to put together a chord-sequence with a smooth and interesting top-line melody. Or, it might happen the other way round – the melody comes first and you find the inversions from your set of chords which harmonise it.
- You apply broken-chord patterns, with an interesting rhythm, to the chords in the chord sequence. This is often enough to make great music out of the bare chords.
- You can make further variations by joining the main melody notes with little next-door-note figures. You can combine the broken chord and next-door note techniques – as in the Module Six riff.
If you want to get to a point where you can sit down at the keyboard and this ‘just happens’, play (and transpose!) the examples given here over and over.
Try to make slight variations on them by:
- changing the chords or inversions;
- changing the broken chord pattern; and
- changing the up/down shape of the next-door-note connecting patterns.
In Musicarta, you have the opportunity to fast-track skills top keyboard players spend years building up. Keep practising!
|
OUT NOW! |
THE MUSICARTA BEAT & RHYTHM WORKBOOK At last! An effective approach to keyboard rhythm & syncopation skills. Learn more! |
ONLY $24.95! |
MODES |
The MusicartaA methodical approach to keyboard syncopation for
|
PUBLICATIONS
exciting keyboard
creativity courses
CHORDS 101
WORKBOOK

~HANON~
video course

Musicarta
Patreon
PENTATONICS
WORKBOOK
video course

Creative Keyboard
video course

BEAT AND RHYTHM
WORKBOOK
- Volume 1 -

12-BAR PIANO
STYLES WORKBOOK
MUSICARTA MODES
WORKBOOK
PIANO STYLE
CANON PROJECT
video course
VARIATIONS
video course
- Piano Solo -
video course
- Piano Solo -

YouTube playlists


 THE LOGO
